Showing posts with label vintage. Show all posts

Sunday, December 25, 2011

All seasons vintage look - part 1

I am a mad collector of vintage clothing but because my style is from 60 years ago the clothes are very fragile and don't stand up to very vigorous wear. Because fashion always reinvents its self, weight long enough and you can find reproductions for a lot cheaper but sometimes that can take years and if you are not so seamstresly gifted (I love my sewing but it still can cost a fortune) you can normally find what you want from op-shops if you look hard enough.

Below I have just put my favorite peaces to wear everyday to make a vintage outfit for all seasons. There are a few things that stay the same (ie. undergarments) but most of these can be used in all the seasons (if you live in Perth) that can be layered. This is just to show that you can do a lot with very little.

Summer/Spring - shirt (op-shop), shorts (Tempt), straw bag (vintage), skirt (Ally), thin cardigan (Cotton On), wedges (Target), necklace (op-shop), brooch (Pigeonhole), scarf (vintage), belt (Big W), hair clips (?), slip (op-shop), garter belt (op-shop), seemed stockings (What Katie Did), cross body bag (op-shop), dress (op-shop), plimsolls (Keds)

Autumn/Winter - shirt (op-shop), wool pants (op-shop), thick cardigan (Alannah Hill), cable knit vest (Dotti), tweed jacket (op-shop), jumper (op-shop), heeled brogues (Big W), knitted scarf (made by me), snood (made by me), scarf (op-shop), brooch (op-shop), wool skirt (make by a friend), knee high cable knit socks (Dangerfield), brogues (Target)

Next I will show you how I put my looks together.

Monday, August 1, 2011

Sporty 40's


The main look of the early 40's was as healthy as possible. Swimming and sunbathing was all the rage (especially in Australia) and it was desirable to look toned and tanned. All girls while at school where made to do calisthenics and sport and cycling clubs where popular as sport not just for general getting from A to B. This sporty fashion was about easy peaces of clothing with a manly edge that could get dirty and be cleaned easily.

Inspiration: Katharine Hepburn
man style pant suits - tailored pointed shirts - high waisted shorts - cotton wrap skirts - shirt dresses - shirt play suits with button down detachable skirts - wrap dresses - short bolero military jackets - raffia flats - plimsolls - leather oxfords and brogues - knitted short sleeve jumpers - hair scarfs

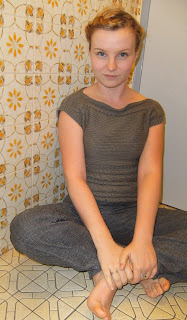
For My Sports 40's Style:
- tweed high waisted wide leg trousers
- knitted short sleeve top
(sorry about the photos, only room with good lighting at night is the bathroom)

my makeup is a thin layer of tinted moisturizer, mascara, thin line of eye pencil on top lash line and a natural pink lip stain. my hair is pined up in twists upwards and away from the face overlapping at the ends.

Hair

Hair was worn away from the face and very loose, think of making your hair look like you have just put it up without thinking about it, with curls gently coming loose. Wear your hair with a scarf knotted on top or a thin ribbon to hold it back and behind your ears. As care free and un-done as possible. Add a 40's baseball cap or a baker boy cap.


Sunday, July 31, 2011

Home Front

For the first time women played a big role not only in the services but also at home. Women where asked to do there bit for the war effort by heading into factories and onto the land to keep the country going. This caused an impact on womens fashion. Women where more concerned about easy to wear clothes that you could accessories with a few thing to take them from a day at home or work to a night out dancing.

Inspiration: the common woman
heavy drill skirt and trouser suits - plaid shirts, skirts and dresses - house dresses - patterned tea dresses - wool coats - plain shirts - hand knitted jumpers and cardigans - tweed - leather low healed court shoes or wedges - scarves - hand made large envelope clutch bags - bucket hand bags - satchel bags - brogues - hand made accessories


For My Home Front Style:
- high waist A line wool tartan skirt
- fine knit jumper with a high neck line
- knitted knee high socks instead of stockings
- leather brogues
- a head scarf to keep hair out of the way


my makeup is a very light powder base with a little pink blush, mascara and a mat pink red lipstick. my hair is very loosely curled to give it a soft wave (my hair is short at the moment)

Hair

Hair was generally mid length and brushed away from the face and held back with pins. Hair was also tied into buns or rolled upwards to keep neat and tidy while at work.
Hats where often hand made out of off cuts of material or knitted. Snoods and hair nets where worn for day and night decorated with flowers and beads. Turbans and scarfs where popular as an easy head covering.

DIY

During WW2 cosmetics and hair products became scares. Every woman was encouraged to put there best face forward to boost moral. Cosmetics where not rationed during the war but most factories where given war work so there was a shortage of products to use. Not wanting to go without there necessities women turned to home remedies for there beauty products.

Hair Care
All recipes are from green eco services

Blonde
Lemon and Water- Mix 1 tablespoon lemon juice in 1 gallon warm water
Tea, Yogurt and Oil-6 chamomile tea bags, 1/2 cup plain yogurt, lavender oil
Bring one cup of water to boil and steep tea bags for 15 minutes. Discard teabags. Combine yogurt and 7 drops of lavender oil with chamomile tea, mix thoroughly. Apply the mixture to dry hair, working through to ends.
Blonde Highlights- 1 cup lemon juice, 3 cups chamomile tea (brewed and cooled)
Mix ingredients, pour over damp hair then let sit for an hour while you sit in the sun, wash out. Follow with a good conditioner.

Brunette
Tea or Black Coffee- Rinse hair with a strong black tea, or black coffee. Shampoo hair. Place a large bowl in sink and rinse hair with cooled coffee. Repeat several times, reusing the coffee. Leave final rinse in hair for at least 15 minutes. Rinse with clear water.
Walnut Husk and Water- imply boil the husks in water for about 15 minutes. After boiling, strain the mixture and use the liquid to color your hair. This homemade hair dye is good for making brown hair darker. (Use Gloves, will stain)

Red
Beet and Carrot Juice -1/2 cup beet juice, 1/2 cup carrot juice. Mix ingredients together, pour over damp hair. Let it sit for 1 hour while you sit in the sun. Wash out.
Rosehips and Cloves- Make a strong tea of rosehips or cloves, or use strong black coffee.

Grey
Sage-Simmer 1/2 cup dried sage in 2 cups water for 30 minutes, then steep for several hours. Apply to hair and leave on until dried. Then rinse and dry. Repeat weekly, until desired shade, then monthly to maintain color.
Sage and Rosemary -make a strong ‘tea’ of Sage and a bit of Rosemary, strain it and refrigerate it, and before washing hair, spray it on the base of the grey patches of hair, even massaged it in. leave it for 5 – ten minutes and then wash as usual, and care for hair normally . After a few weeks of this, the grey is disappearing. (use daily) After using the sage the normal coloring returns to the hair. It is not a ‘color-change’ shocker, and it will soften, and the amount of grey.


Home Made Lipsticks
Both recipes are from eHow Style
Ingredients - Almond oil, Grated beeswax, Double boiler, Beet juice or beetroot powder, Lidded container or lipstick tube
1. Combine two tablespoons of olive oil with one tablespoon of grated beeswax in the top of a double boiler. Heat on low heat until the beeswax is completely melted. Alternatively, you may place the oil and wax in a microwave safe dish, and heat on high for 1-2 minutes. 2. Add one teaspoon of beet juice or beetroot powder to the oil mixture. Stir to combine thoroughly. This will provide the coloring for your natural lipstick. Add more or less depending on how deep you want the color.

3. Remove the natural lipstick mixture from the heat, and transfer immediately to a small lidded container or lipstick tube. Allow to cool completely, and then apply to the lips with a clean finger or lipstick brush, as necessary.

Ingredients - 3 nontoxic crayons (your choice of color), 1 100 percent pure beeswax candle (no added color, 1-inch diameter), 3 tbsp. oil (mineral oil, baby oil, soy oil, coconut oil, etc.), Resealable plastic bag, Hammer, Heat-resistant cup, Small container with a lid or an empty lipstick tubeSaucepan

1. Remove the paper labels off the crayons, and place them in a resealable plastic bag. Break up the crayons into smaller pieces with a hammer. Put the crayon pieces, oil and a 1-inch segment of candle in a heat-resistant cup. Place the cup in a saucepan on the stove.

2. Fill the saucepan with enough water to reach about an inch up the side of the cup. Heat the contents of the pan on a low temperature setting, stirring occasionally, until the ingredients in the cup melt together. Remove from heat and take the cup out of the pan. Allow the contents to cool slightly--about one to three minutes.

3.Pour the mixture into a small container or an empty lipstick tube while still warm. Allow the lipstick to cool completely (uncovered). Cover or close the container.

Home Made Cleansing Cream
Both recipes are from eHow Style
Ingredients- Container (> 1 cup), 1 tbsp glycerin, 1/8 cup baking soda,1/2 cup water, 1/8 cup vegetable oil,1/8 cup stearic acid powder
1. First clean the container you will be using by dunking it in boiling water. This will sterilize it and remove any contaminants and bacteria, keeping them out of your homemade facial cleansing cream.
  • 2. Next, choose a vegetable oil that you like the smell of. This will define the aroma of your facial cleanser. Mix the stearic acid powder and the vegetable oil into a microwave safe cup and microwave it for 10 seconds at a time, stirring between zaps until the powder has dissolved. A complete dissolved powder is important to the structure of the facial cleansing cream.
  • 3. Next, microwave a mixture of the baking soda, water and glycerin in another microwave safe cup until the mixture begins to boil. Make sure the mixture is boiling, as this is important to the structure of the facial cleansing cream.
  • 4. Pour the boiling mixture into the container with the oil and dissolved powder, and whip the concoction until it feels light and fluffy, like a commercial facial cleansing cream. Move the cream into your container and chill it in the refrigerator over night. Cap the container the next day, and you have now finished your facial cleansing cream.