Sunday, July 31, 2011

Rationing


Rationing was a scheme to give everyone a fair share of food, clothing and fuel in a time of shortage. This was important so that no one went without because they did not have enough money as shortages made general food prices very high. When people went shopping they would give over there ration card and they would receive there weekly food ration.

In Britten the ration for an adult was:
- Bacon and ham - 100g/4oz
- Butter - 50g/2oz
- Cheese - 50g/2oz
- Marg - 100g/4oz
- Cooking fat - 100g/4oz (often dropping to 2oz)
- Milk - 3pts/1800ml (but not always)
- Sugar - 8oz/225g
- Preserves - 1lb/450g every two months
- Tea -2oz/50g
- Eggs - one shell egg a week if available
- Dried eggs - one pack per month
- Sweets -12oz/350g a month
- Plus monthly points scheme for fish, meat, fruit or peas

Because of shortages people where encouraged to reduce there waste of food by picking food freash from the garden everyday and to make preserves to store any surplus food. There where recipes books issued to householders to teach them how to use their rations best. They suggested substitutes such as mashed potato for flour, sour milk for cheese, grated vegetables for fruit and whipped margarine with vanilla instead of cream.
There has been a recent trend in rationing as a diet as it has low amounts of oil, sugar and meat and a high importance on fruit and veggies. It also has a lot of whole grains in the diet and an importance on home cooking. I have made ration recipes before and do enjoy the clever use of ingredients I have to say that to a modern taste pallet it can be quite bland. I recommend that if you are going to adopt a ration diet to adapt it to your own tastes with herbs and spices.

Hear are some nice recipes to try at home for a ration meal
2 versions of Woolton Pie
Ingredients:
Various in season veggies like swedes, turnips, potatoes, cauliflower, broccoli, leeks, onions, carrots
Potatoes for mashing
Flour, butter and milk for sauce
Strong grated cheddar cheese
Herbs such as sage or thyme for sauce
Method
Peel washed potatoes (save peelings to bake in oven with salt and herbs)
Dice potatoes and cook in salted water until soft
Mash with butter, a little milk and add salt
Peel, wash and dice in season veggies as applicable and boil until nearly cooked
Drain and place in pie dish
Make sauce-Use dessert spoon of butter and melt in pan, add two dessert spoons of flour and mix and slowly add in milk, keep stirring. Add salt and herbs and pepper
Pour thick sauce over the vegetables
Put mashed potato in piping bag (baggy with a hole in the corner)
Pipe over the top of veggies and sauce
Finish by placing some grated cheese over the top
Place in oven at 220 C for around 30 minutes until the potatoes have browned

Ingredients:
1lb diced potatoes
1lb cauliflower
1lb diced carrots
1lb diced swede
3 spring onions
1 teaspoon vegetable extract
A little chopped parsley
1 tablespoon oatmeal
Method:
Cook everything together with just enough water to cover, stirring often to prevent it sticking to the pan. Let the mixture cool.
Spoon into a pie dish, sprinkle with chopped parsley.
Cover with a crust of potatoes or wholemeal pastry.
Bake in a moderate oven until golden brown.
Serve hot with gravy.

Eggless Sponge and Mock cream
Sponge:
1/2 pint of tea (without milk and tea leaves)
3 oz butter/marg
3 oz sugar
3 oz sultanas
10 oz wholewheat flour (add 3-4 teaspoons of baking powder)
1 teaspoon all spice (mixed spice)
extra cinnamon if required
Cream:
2 oz margarine
2 oz fine granulated sugar
1 tablespoon dried milk powder
1 tablespoon milk
Method
For Sponge:
Place the tea, butter, sugar and sultanas in a saucepan and heat gently until butter is melted, leave to cool.
Mix all the dry ingredients together.
Mix all the dry ingredients into the cooled liquid and mix well, give it a beat.
Put mixture into a greased and floured 7 inch cake tin
Cook on 180 degrees for around 45 minutes or more
For Cream:
Cream the sugar and margarine together until light and fluffy
Add in the dried milk powder and milk and beat well until light and fluffy again
Chill and serve

one to give you a giggle

Home Front

For the first time women played a big role not only in the services but also at home. Women where asked to do there bit for the war effort by heading into factories and onto the land to keep the country going. This caused an impact on womens fashion. Women where more concerned about easy to wear clothes that you could accessories with a few thing to take them from a day at home or work to a night out dancing.

Inspiration: the common woman
heavy drill skirt and trouser suits - plaid shirts, skirts and dresses - house dresses - patterned tea dresses - wool coats - plain shirts - hand knitted jumpers and cardigans - tweed - leather low healed court shoes or wedges - scarves - hand made large envelope clutch bags - bucket hand bags - satchel bags - brogues - hand made accessories


For My Home Front Style:
- high waist A line wool tartan skirt
- fine knit jumper with a high neck line
- knitted knee high socks instead of stockings
- leather brogues
- a head scarf to keep hair out of the way


my makeup is a very light powder base with a little pink blush, mascara and a mat pink red lipstick. my hair is very loosely curled to give it a soft wave (my hair is short at the moment)

Hair

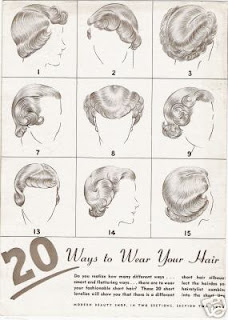
Hair was generally mid length and brushed away from the face and held back with pins. Hair was also tied into buns or rolled upwards to keep neat and tidy while at work.
Hats where often hand made out of off cuts of material or knitted. Snoods and hair nets where worn for day and night decorated with flowers and beads. Turbans and scarfs where popular as an easy head covering.

DIY

During WW2 cosmetics and hair products became scares. Every woman was encouraged to put there best face forward to boost moral. Cosmetics where not rationed during the war but most factories where given war work so there was a shortage of products to use. Not wanting to go without there necessities women turned to home remedies for there beauty products.

Hair Care
All recipes are from green eco services

Blonde
Lemon and Water- Mix 1 tablespoon lemon juice in 1 gallon warm water
Tea, Yogurt and Oil-6 chamomile tea bags, 1/2 cup plain yogurt, lavender oil
Bring one cup of water to boil and steep tea bags for 15 minutes. Discard teabags. Combine yogurt and 7 drops of lavender oil with chamomile tea, mix thoroughly. Apply the mixture to dry hair, working through to ends.
Blonde Highlights- 1 cup lemon juice, 3 cups chamomile tea (brewed and cooled)
Mix ingredients, pour over damp hair then let sit for an hour while you sit in the sun, wash out. Follow with a good conditioner.

Brunette
Tea or Black Coffee- Rinse hair with a strong black tea, or black coffee. Shampoo hair. Place a large bowl in sink and rinse hair with cooled coffee. Repeat several times, reusing the coffee. Leave final rinse in hair for at least 15 minutes. Rinse with clear water.
Walnut Husk and Water- imply boil the husks in water for about 15 minutes. After boiling, strain the mixture and use the liquid to color your hair. This homemade hair dye is good for making brown hair darker. (Use Gloves, will stain)

Red
Beet and Carrot Juice -1/2 cup beet juice, 1/2 cup carrot juice. Mix ingredients together, pour over damp hair. Let it sit for 1 hour while you sit in the sun. Wash out.
Rosehips and Cloves- Make a strong tea of rosehips or cloves, or use strong black coffee.

Grey
Sage-Simmer 1/2 cup dried sage in 2 cups water for 30 minutes, then steep for several hours. Apply to hair and leave on until dried. Then rinse and dry. Repeat weekly, until desired shade, then monthly to maintain color.
Sage and Rosemary -make a strong ‘tea’ of Sage and a bit of Rosemary, strain it and refrigerate it, and before washing hair, spray it on the base of the grey patches of hair, even massaged it in. leave it for 5 – ten minutes and then wash as usual, and care for hair normally . After a few weeks of this, the grey is disappearing. (use daily) After using the sage the normal coloring returns to the hair. It is not a ‘color-change’ shocker, and it will soften, and the amount of grey.


Home Made Lipsticks
Both recipes are from eHow Style
Ingredients - Almond oil, Grated beeswax, Double boiler, Beet juice or beetroot powder, Lidded container or lipstick tube
1. Combine two tablespoons of olive oil with one tablespoon of grated beeswax in the top of a double boiler. Heat on low heat until the beeswax is completely melted. Alternatively, you may place the oil and wax in a microwave safe dish, and heat on high for 1-2 minutes. 2. Add one teaspoon of beet juice or beetroot powder to the oil mixture. Stir to combine thoroughly. This will provide the coloring for your natural lipstick. Add more or less depending on how deep you want the color.

3. Remove the natural lipstick mixture from the heat, and transfer immediately to a small lidded container or lipstick tube. Allow to cool completely, and then apply to the lips with a clean finger or lipstick brush, as necessary.

Ingredients - 3 nontoxic crayons (your choice of color), 1 100 percent pure beeswax candle (no added color, 1-inch diameter), 3 tbsp. oil (mineral oil, baby oil, soy oil, coconut oil, etc.), Resealable plastic bag, Hammer, Heat-resistant cup, Small container with a lid or an empty lipstick tubeSaucepan

1. Remove the paper labels off the crayons, and place them in a resealable plastic bag. Break up the crayons into smaller pieces with a hammer. Put the crayon pieces, oil and a 1-inch segment of candle in a heat-resistant cup. Place the cup in a saucepan on the stove.

2. Fill the saucepan with enough water to reach about an inch up the side of the cup. Heat the contents of the pan on a low temperature setting, stirring occasionally, until the ingredients in the cup melt together. Remove from heat and take the cup out of the pan. Allow the contents to cool slightly--about one to three minutes.

3.Pour the mixture into a small container or an empty lipstick tube while still warm. Allow the lipstick to cool completely (uncovered). Cover or close the container.

Home Made Cleansing Cream
Both recipes are from eHow Style
Ingredients- Container (> 1 cup), 1 tbsp glycerin, 1/8 cup baking soda,1/2 cup water, 1/8 cup vegetable oil,1/8 cup stearic acid powder
1. First clean the container you will be using by dunking it in boiling water. This will sterilize it and remove any contaminants and bacteria, keeping them out of your homemade facial cleansing cream.
  • 2. Next, choose a vegetable oil that you like the smell of. This will define the aroma of your facial cleanser. Mix the stearic acid powder and the vegetable oil into a microwave safe cup and microwave it for 10 seconds at a time, stirring between zaps until the powder has dissolved. A complete dissolved powder is important to the structure of the facial cleansing cream.
  • 3. Next, microwave a mixture of the baking soda, water and glycerin in another microwave safe cup until the mixture begins to boil. Make sure the mixture is boiling, as this is important to the structure of the facial cleansing cream.
  • 4. Pour the boiling mixture into the container with the oil and dissolved powder, and whip the concoction until it feels light and fluffy, like a commercial facial cleansing cream. Move the cream into your container and chill it in the refrigerator over night. Cap the container the next day, and you have now finished your facial cleansing cream.
  • Saturday, July 30, 2011

    40's Hair and Makeup

    I have often been asked that as a 40's hair and makeup style it must take me hours to put my look together and when I first started, I have to admit that it did, but as I practiced it got easier. These are a few of my favorite YouTube clips to help get your 1940's look started.

    Simple daytime hairstyle
    Daytime is all about easy wear. Victory rolls where very popular but if you are stating off they can drive you insane but there are many other easier daytime styles that are very achievable. Plats where very popular and can be worn as 2 pigtail plats, french braided on top and left out as half up half down, worn as a crown braid or as heidi/milkmaid braid. Turbans and silk scarfs are good to have on the bad hair days. Flowers can hide a multitude of stuff-ups that you make and look grate in your in the summer. If all else fails put a 40's hat on.

    Evening hairstyle
    The evening is a time to shine. There is never a night out where you are too formal with 40's hair. Go for Veronica Lake waves, extreme up-styles with lots of curls with jeweled clips (clip on earnings can make amazing hair clips) and flowers. These styles can be very intimidating so try working up to the harder styles as you become more confident in your abilities.

    Quick curling set
    All 40's styles are about curly hair. Modern hair curling tools make it fast and easy to get curls. You want them to be big curls that are not tight but defined. Hot rollers are the best to get even curl all over and good hold for up styles. Hot tongs and hair straighteners make good waves but the sectioning can be very ruff .

    Authentic pin curling technique
    If you have reluctant hair that don't keep curls very well pin curling is your only option (if you don't want to go to the extreme of perming). To get your hair to stay curly all the next day you have to wet set your curls.
    - To wet set you need to start with wet clean hair, after a shower is good but do not put conditioner in it will make your hair slippery and won't hold a curl, then coat your hair with a setting lotion of your preference. I have tried many different lotions to set my curls and it can be a little trial and error. I have used mousse, salt spray, curling serum and hairspray. I use Cedel hairspray (the pink can) that is made for setting wigs so it is strong but can be easily brushed out when dry.
    - Take sections of hair whatever thickness you want the curls to be and make a circle starting at the bottom of your hair and roll up to the root and secure with bobbie pins or pin curl clips.
    - When all your hair is secured spray again with setting lotion and wrap a scarf over them to keep them in place. It will take at least 6 to 12 hours to set your hair fully where it is fully dry so sleeping in them is a very good option (it will feel uncomfortable but you will get use to it) when dry un-clip all the curls and brush out to your style.
    You can pin curl your hair at night and re set it to keep it curly for a few days after the original wet set as long as you use dry shampoo every day to clean out any oil.

    Everyday makeup
    Daytime makeup is easy and probably not very different to your normal makeup routine. The 40's day makeup was all about natural with highlighting.
    - start with a tinted moisturizer with an spf 30, you can mix your own with your normal foundation and moisturizer until you can get a close natural colour
    - set with powder, mineral powders are perfect for it
    - apply blusher in a light pinkish colour to the apples of your cheeks, if you want to use a bronzer keep it as light and natural as possible so no contouring
    - for eyes you can just use mascara with a build up at the outer corner of the eye or you can also add a medium neutral eye shadow with a thin line of eyeliner at top eyelash root
    - for eyebrows you can draw them in with a natural shade pencil or keep them natural with no makeup
    - lips to be a bright red colour, cherry or pure red no dark reds for daytime, with a rounded top at cupids bow

    Evening makeup
    For nighttime makeup it needs to be more dramatic
    - start with mat foundation with an even coverage
    - set with powder
    - apply blusher in a rose pink to the apples of your cheeks
    - for eyes start with a trio of neutral eye shadow from light to dark, you can add a little medium colour, then add a thick line of eyeliner at top eyelash root. then use mascara with a build up at the outer corner of the eye and you can also add false lashes
    - for eyebrows draw them in with a natural shade pencil
    - lips to be a bright red colour, pillar box pure red or dark reds as a strong standout, with a rounded top at cupids bow

    Nails

    Friday, July 29, 2011

    40's Fashion

    People who see me in the street when I am all decked out in my 40's style have often said "wow! you must spend so much money to look like that" but really I don't. Most woman will have the basis for a 40's outfit in there wardrobe it just mean that you have to sift through to find the right elements.
    The look at the beginning of the 40's was very masculine with strong shoulders (think of 2 triangles with the points touching each other) small waists and on the knee skirt hemlines. Necklines where high with small collars and trousers where wide legged with flow. Jackets where cut straight to end ether at the waist or mid thigh. Playsuits where popular with matching skirts for multi use.

    Dresses had A line skirts and creative detailing Wrap dresses and shirt dresses where very popular and dresses with a peplum where also popular. Dresses where split into 4 catagories, house dresses to be worn around the house when doing general housework, day dresses where simple for running errands around town, afternoon tea dresses for social outings in the afternoon (and informal evening events) and evening/cocktail dresses that where used for formal social occasions ether worn with a long skirt (if you had the money) or over the knee length.

    The 40's new look was more feminine. Skirt lengths where mid calf length and ether long and straight pencil skirt or a billowy circle skirt. Waists where tiny to accentuate the womens curves. Necklines where still high with v necks or scoop necks.

    Knitted jumpers, cardigans, twin sets and even dresses where worn by every woman. They where normally knitted by hand (it was a subject all girls had to take at school) with very thin wool as a fine knitt. There where lots of patterns with different colours and different stitch patterns. The modern t shirt was not normally worn so a short sleeve jumper where normally instead.